Installing Linx Server
Online installation
Contact us to discuss your server needs and the available options.
Installing Linx Server:
- Open the Linx Server installer and provide the following details:

Note:
The default server port can be changed to any available port setting.
You can create your own password of choice. It is advisable to create a password that contains a combination of upper and lower-case letters, numbers and special characters. - Click the Install button.
- Open your Linx Server.
The server will be accessible at
https://localhost:8022/ on the machine where it was installed. Alternatively, use the port that was specified during installation (see step 5 above) instead of 8022. - Log in to Linx Server.

Note:
You have to log in with the details that you supplied when you installed Linx Server (see step 5 above). - Provide the license details that were emailed to you.

- Click Start using Linx.
Offline installation
GetLinx
This method can be used to both install the Linx applications or Update packages if Linx is already installed.
Steps:
- Download the GetLinx Application. (You will receive a link directly from us.)
- Once the download has been completed, open the file. This will open the 7-Zip self-extracting archive, choose a desired archive location and extract the files.
- Following the successful extraction, open the Command Prompt and follow the below commands.
cd #TargetFolder# -- This is where the files were extracted to, for examplecd C:\GetLinx\ - The following optional options exist when executing the GetLinx.exe from the command line (to view these you can enter the command
GetLinx.exe –help )
-p Target folder where packages will be saved.
-v Application version to download. If not specified the latest released version will be used.
-i Target folder where the installers will be saved
-l Full path and name of the log file
--help Display this help screen
Best practice:
- It is suggested that you store the packages retrieved with the GetLinx tool in a centralized repository so that if you are part of a distributed team, everyone has access to the same packages. You can do this once you have downloaded the necessary packages by moving them to the target location.
- After making your decisions on the paths and log files you can then run the command below (replace the file paths with your chosen file paths or you can just copy the below command and execute it):
Getlinx.exe
OR
GetLinx.exe -p C:\GetLinx\Feeds\ -v 5.15.10755 -i C:\GetLinx\Installers\ -l C:\GetLinx\log
OR
GetLinx.exe -p C:\GetLinx\Feeds\ -i C:\GetLinx\Installers\ -l C:\GetLinx\log
This will start the process of retrieving the relevant packages for Linx to use.
If you navigate to the archive folder, you will notice that the directories specified in the command will be created and populated.
Installers (Or whatever you decided to name your folder for -i in the command): These are the installation executables for both the server and the designer.
Feeds (Or whatever you decided to name your folder for -p in the command): There will be two sub folders namely:
- App: This contains application specific update data for Linx itself
- Plugins: This contains the packages used for updating the Linx Plugins
You will need to copy/move this folder to a location on the target machine that it has access to, this can be directly on the computer or a shared repo.
Installing the Offline LINX Application Server
- After running GetLinx and retrieving the installation files, navigate to the Installers folder (Or whatever you decided to name your folder for -i in the command). Then execute the Linx Server Setup.exe file. Please take note of where these files are once you add them to your target machine.
- Once it is opened, complete the fields like its described below: Default server Port: The default server port can be changed to any available port setting. It is suggested that you leave it as the default 8022 for now. Email: Must be a valid email address Password: You can create your own password of choice. It is advisable to create a password that contains a combination of upper and lower-case letters, numbers and special characters. Remember this password or else you will not be able to access your Linx Application Server.
- Click Install
- In Windows Explorer, open the file located at:
C:\ProgramData\Twenty57\Linx Server 5\Settings.json.
(Note: This is a hidden folder. Set your File Explorer to show hidden items.)
This file contains a JSON string which points the server to the update repositories.
- Edit the JSON string (in a text editor) and point the config values to the repos that GetLinx created, like below (Note: Due to it being a JSON string, you must make use of the escape character ‘\’ when referencing the ‘\’ character):
{ “applicationUpdateRepository”: “C:\\GetLinx\\Feeds\\App”, “pluginUpdateRepository”: “C:\\GetLinx\\Feeds\\Plugins”, “sendAnalytics”: “True” }
For referencing a server shared location, remember to add additional escape characters ‘\’ at the beginning of the path. To repo location must also have the correct permissions for access.
If you have already installed the Linx Application Designer, then you can copy the file located atC:\ProgramData\Twenty57\Linx Designer 5\Settings.json into the locationC:\ProgramData\Twenty57\Linx Server 5\ and replace the existing file.
- In the Windows Local Services Manager, restart the ‘Linx Server’ service.
- Open your Linx Application Server
The server will be accessible at
https://localhost:8022/ on the machine where it was installed. Alternatively, use the port that was specified during installation (see step 2 above) instead of 8022. - Log in to the Linx Application Server with the credentials used in Step #2.
- Provide the license details that were emailed to you from the support team.
- Click Start using Linx.
Server Configuration Management
Additional Server Configuration
Some Linx Application Server settings are contained in the following configuration file:
To enable Linx Application Server to send server related emails (e.g. password resets), add these SMTP settings to the config file's app settings:
<appSettings>
<add key="SmtpHost" value="my-smtp-server.com"/>
<add key="SmtpPort" value="587"/>
<add key="SmtpFromEmailAddress" value="linx@domain.com"/>
<add key="SmtpUserName" value="user-name"/>
<add key="SmtpPassword" value="my-smtp-password"/>
</appSettings>
More configuration settings and issues are covered in the Linx Community.
Note:
Do a restart of your Linx Application Server for the changes to take effect.
Getting Past Size Limitations of REST WebServices
The Linx Support Team often receive queries about issues with size limitations on Web Services. Two specific scenarios: - Receiving Large requests - Sending Large responses
Errors that are received include “413 (Request Entity Too Large)” or “Response over configured buffer size”.
To fix this, there are 3 sets of configurations that needs to be done.
The first is to solve the 413 error, and that is to configure the computer itself to receive larger files. This post explains the steps: http://blogs.catapultsystems.com/rhutton/archive/2012/07/22/request-entity-is-too-large-over-ssl-in-iis-7/1
You can also use this in CMD.exe:
There are also some configurations you can set in the “C:\Program Files (x86)\Twenty57 Linx 5\bin\Twenty57.Linx.Server.Core.exe.config”:
You’ll have to play with the numbers a bit.
<appSettings>
<add key="WebServerPort" value="8022" />
<add key="WCFSendTimeoutSeconds" value="60" />
<add key="WCFReceiveTimeoutSeconds" value="600" />
<add key="WCFMaxReceivedMessageSizeBytes" value="20485760" />
<add key="WCFMaxStringContentLengthCharacters" value="2000000" />
<add key="WCFMaxFaultSizeBytes" value="128536" />
</appSettings>
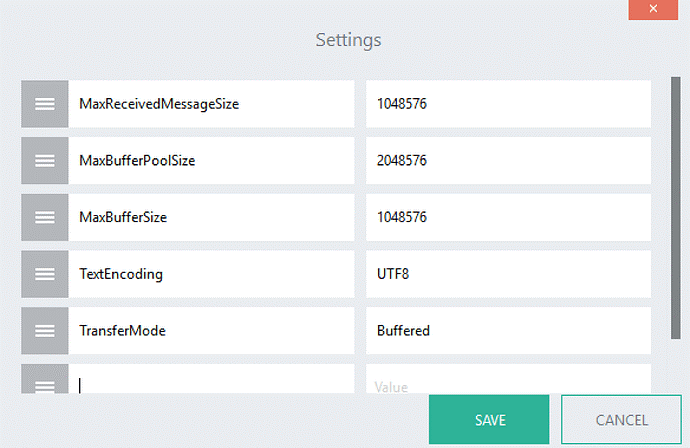
Lastly, set the