Shopify exposes a REST API for 3rd party applications to integrate with. This guide will cover connecting to the Shopify Admin API with Linx using API Keys in conjunction with the HTTP Basic scheme authentication and some request examples.
You can use webhook subscriptions to receive notifications in a Linx Application about particular events in a Shopify store. After you’ve subscribed to a webhook, you can let your app execute code immediately after specific events occur in shops that have your app installed instead of having to make API calls periodically to check their status. For example, you can rely on webhooks to trigger an action in your app when a customer creates a cart, or when a merchant creates a new product in their Shopify admin. By using webhooks subscriptions you can make fewer API calls overall, ensuring that your apps are more efficient and updated quickly.
More details on Shopify Webhooks can be found here.
Integrating Shopify
Creating a Linx application and connecting it to Shopify involves the following steps:
- Creating a private app and generating an API Key.
- Configuring Linx to authenticate.
- Customizing requests.
Resources
- Shopify REST API reference documentation: Developer documentation related to the Shopify Admin API.
- ShopifyTemplate.lsoz (22.5 KB): Template Linx application. Open it in the Linx Designer to follow this guide.
- Further Reading: Shopify, Linx and webhooks
Create a Private App
To access and modify your Shopify resources using Linx, you first need to register a private app with Shopify. This will then generate the relevant API Key, which must be used when making requests from Linx.
To register a private app, log in to your Shopify dashboard, navigate to the Apps dashboard (Left menu > Apps). Click on the Manage private apps link, which will open your private app dashboard. If you haven’t already, enable private app development. Once enabled, click on the Create New App button. Give your app a name such as “LinxApp” and complete the contact details.
In the Admin API section, show the inactive permissions of the app (by default, none are selected).
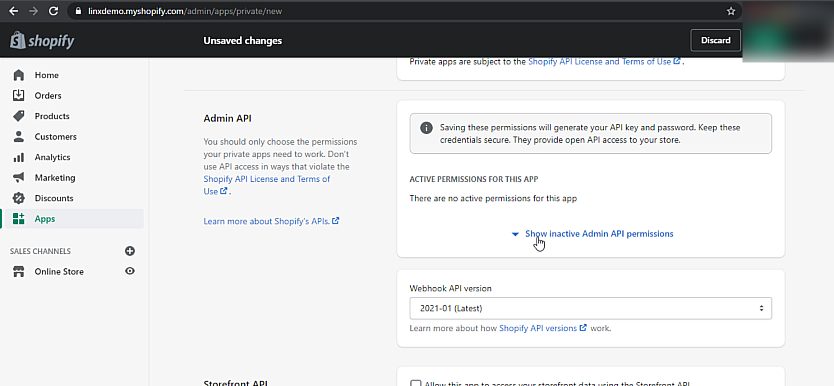
Select the relevant permissions; these will be the access scope of the linked application. In this guide, we will be reading and writing data to the Customers and Products resources; you can modify the access permissions later.
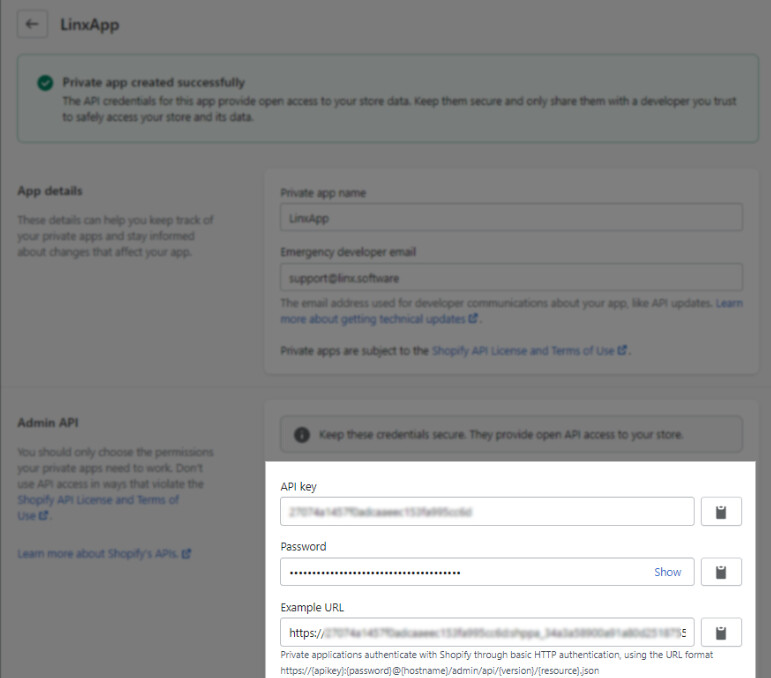
Scroll to the bottom of the page and click Save, then create app. Your app authentication details will be displayed:
- API Key: Key used as the
usernamein the HTTP Basic authentication of the request and the request URL. - Password: Used as the
passwordin the HTTP Basic authentication of the request. - Base URL: Example of the base URL to use when requesting to your instance.
Connect to Shopify
To connect to the Shopify API, drag a CallRESTEndpoint onto a user-defined function and configure the relevant properties described below:
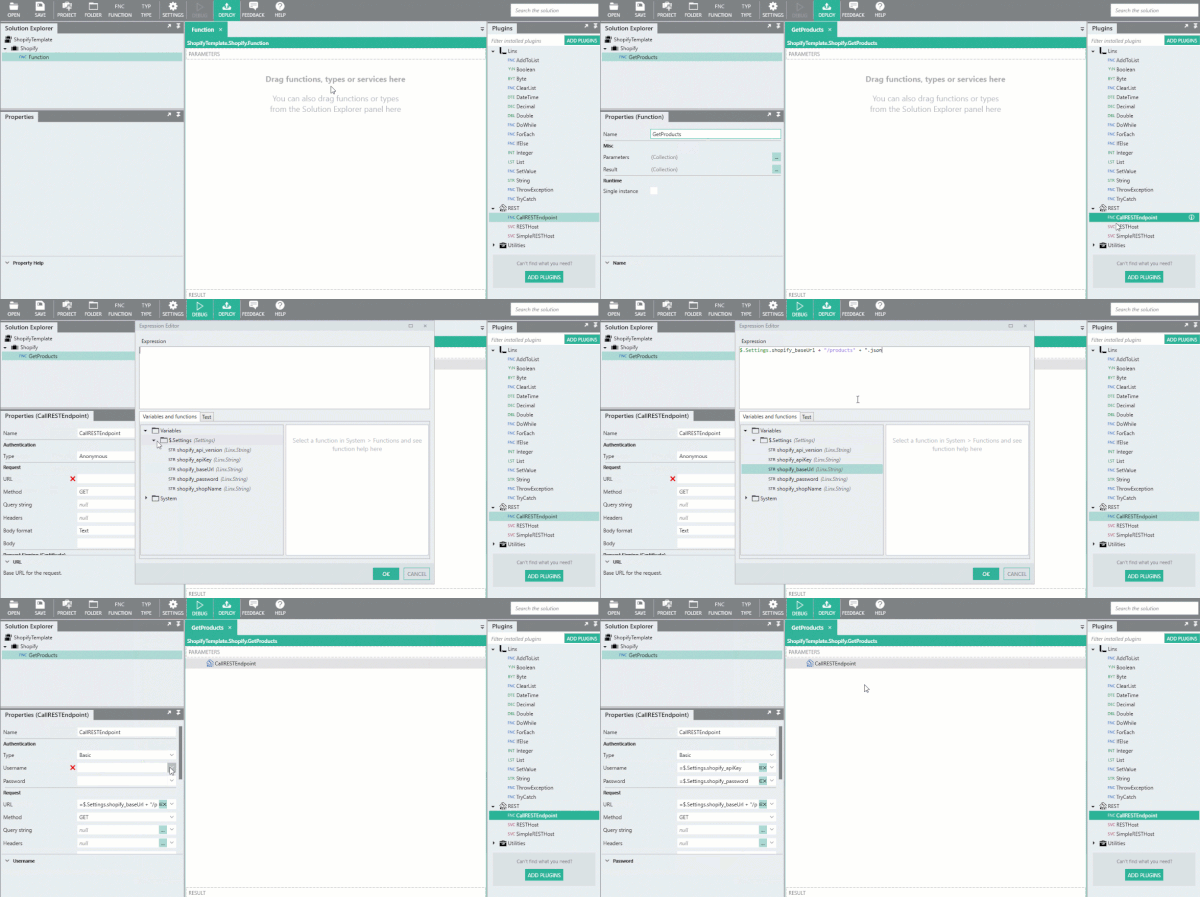
A best practice is creating $.Settings values for all the needed constants in our application which may change later. By making these $.Settings values, we can reference them throughout our Linx application and update them in a single place to have application-wide effects.
Create new $.Settings values and add your authentication details.

Creating the Base URL
When making requests to the Shopify API, you need to build up the base URL of each request like below:
https://{apikey}:{password}@{hostname}/admin/api/{version}/{resource}.json
In Linx, this can be done via the use of expressions or using dynamic settings.
In the provided template application, the URL is built up via a dynamic setting expression. The $.Settings.shopify_baseUrl has the structure of the URL and placeholder references that reference other $.Settings values. At runtime, the values referenced in the other settings will be concatenated into a base URL.
https://{shopify_apiKey}:{shopify_password}@{shopify_shopName}.myshopify.com/admin/api/{shopify_api_version}
At runtime, the value of $.Settings.shopify_baseUrl will be:

When a request is made, the base URL can just be based on this $.Setting value. The particular resource path can then be added in each request using an expression like below:
= $.Settings.shopify_baseURI + "/products" + ".json"
Authentication
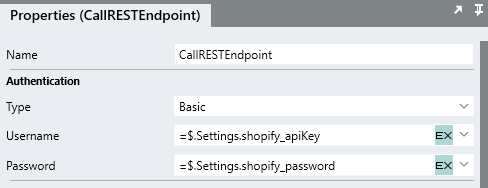
Private applications authenticate with Shopify through basic HTTP authentication.This can be accomplished by completing the CallRESTEndpoint Authentication properties like below:
Querying and Modifying Data
The below examples are demonstrations of interacting with the Shopify API and Linx.
Querying Customers
The below example deals with the Customer object. The function makes a GET request to the /customers endpoint, which returns a JSON string response containing a list of all the customers. The response is then imported by Linx into a custom-type object which is then used to structure the response body.
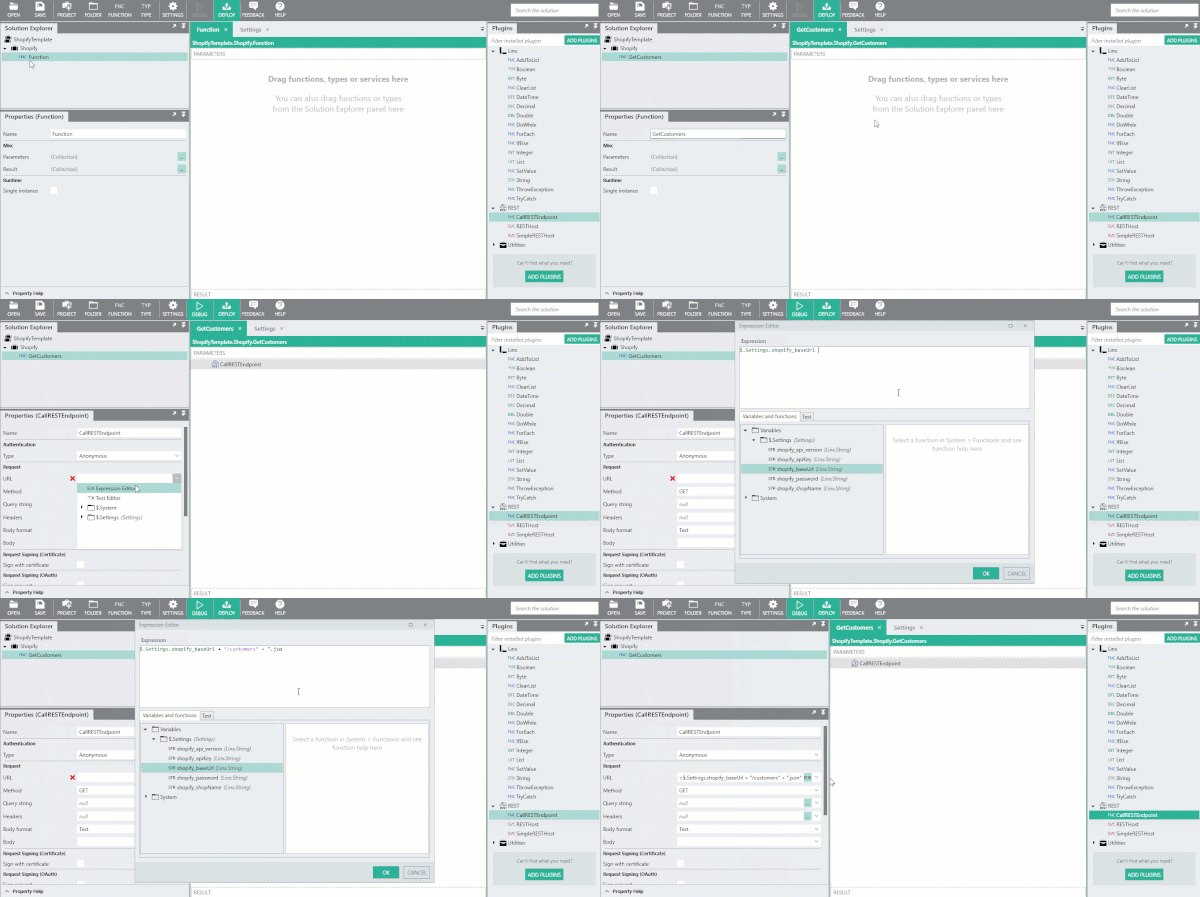
First, create a new Function and give it the name of GetCustomers. Drag a CallRESTEndpoint onto the GetCustomers canvas.
Complete the Basic authentication details by referencing the API Key and password from earlier. Then configure the URL to be like the below (using the expression editor):
= $.Settings.shopify_baseURI + "/customers" + ".json"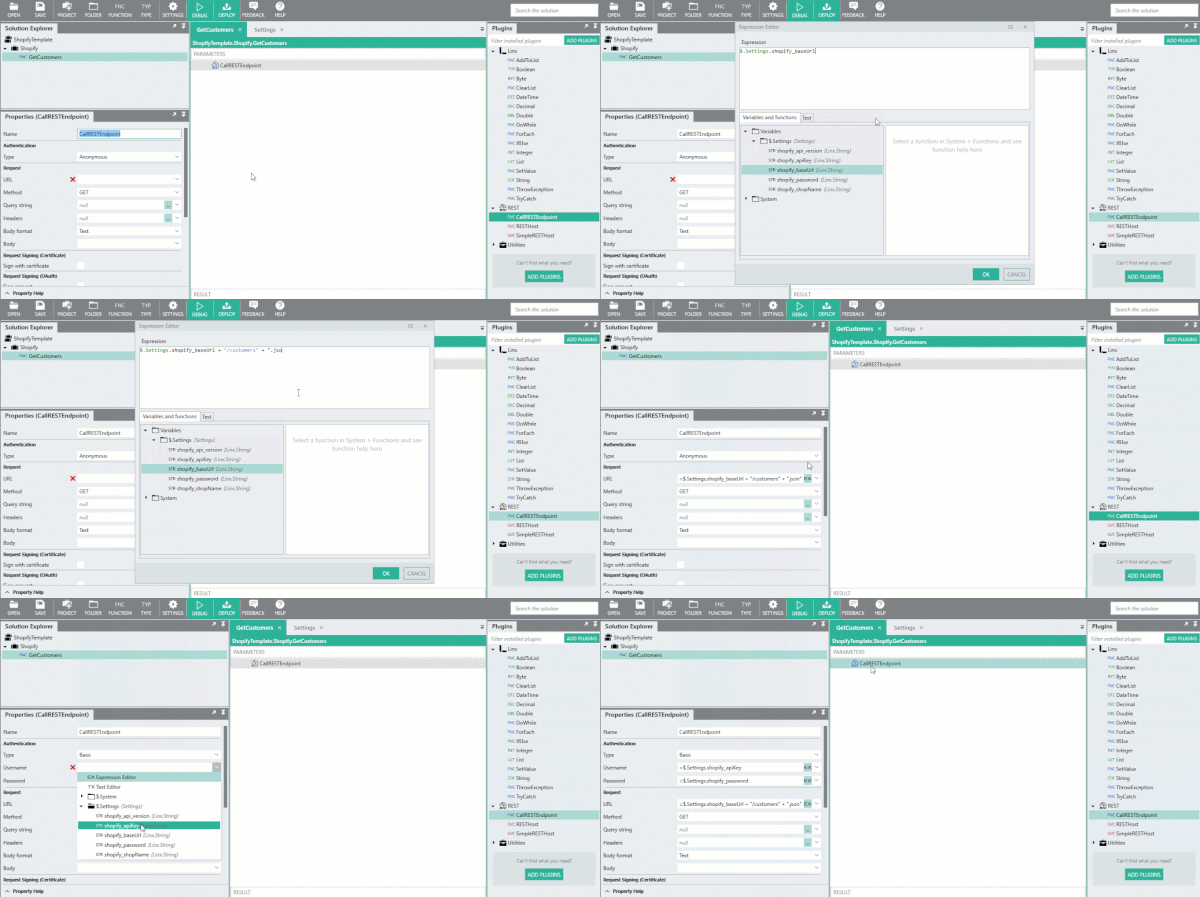
Right-click on the CallRESTEndpoint and Add breakpoint and Enable logging; this will expose the runtime values of the objects in scope. Next, debug the GetCustomers function and take note of the response body returned in the Debug Values panel.
The response body is a JSON string
This object contains a parent object containing a ‘customers’ child object which contains a list of objects which contain the fields related to the product we are creating.
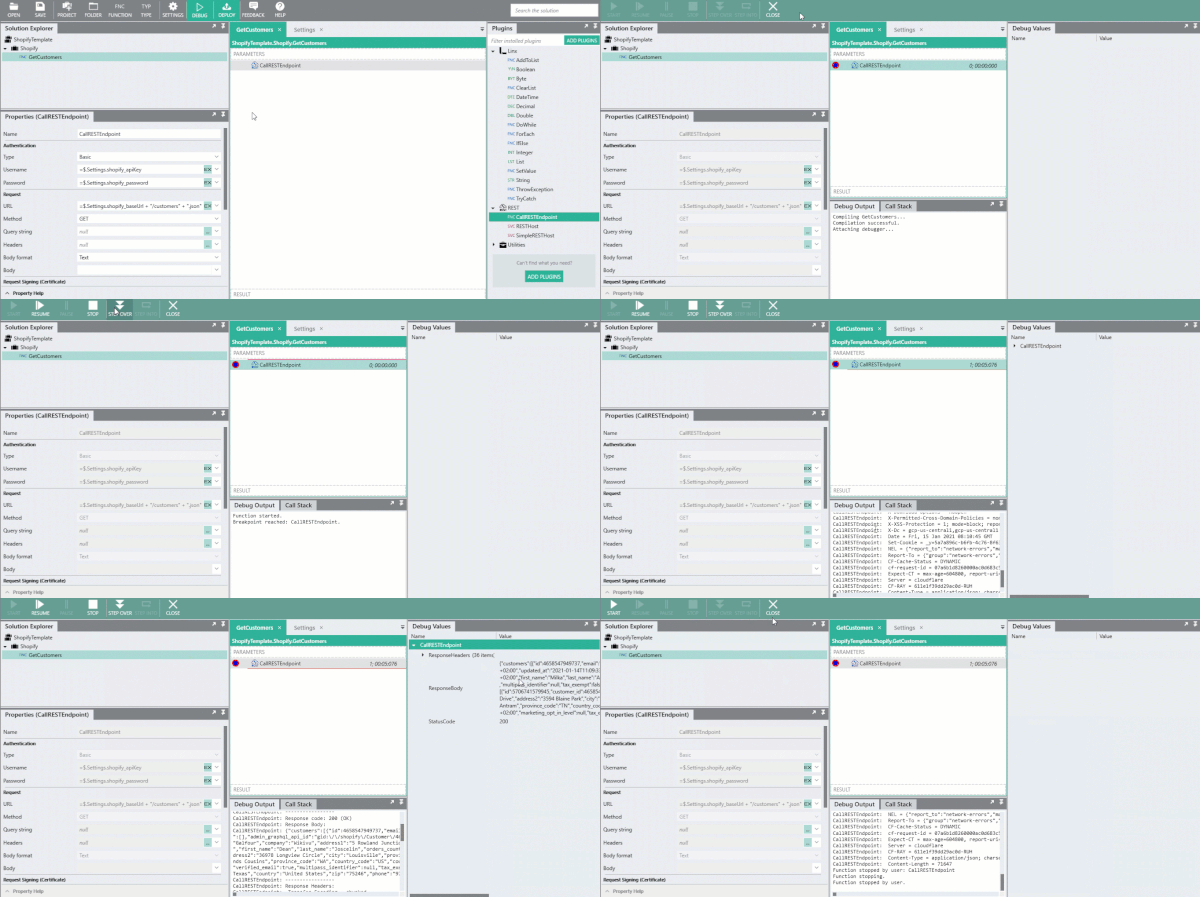
Next, we need to create a custom data type so Linx will know what to parse the response body into; this will allow us to work with individual field values in subsequent operations. Copy the value of CallRESTEndpoint.ResponseBody from the Debug values panel or from the API documentation. Import the copied JSON string as a new Type. This will create a data object or type for you to structure the response data into. Configure the CallRESTEndpointFNC to have an Output type of the newly imported user-defined type.
Adding Products
In the below example, a Product will be added to Shopify. This will involve making a POST request to the /products endpoint. A JSON structure containing details of a Product will be submitted as the request body.
Example request:
In the below example, we are going to create a user-defined function that will take in a product’s details as the input parameters. These details will then be assigned to the user-defined type and submitted in a request.
First, in order to submit a valid JSON data structured like the above, you need to create a user-defined Type that matches the fields in the product object, either manually or by importing the provided JSON example as a new Type with the name of ‘newProduct.’ This will create two types, a parent newProduct which holds a child newProduct_product.
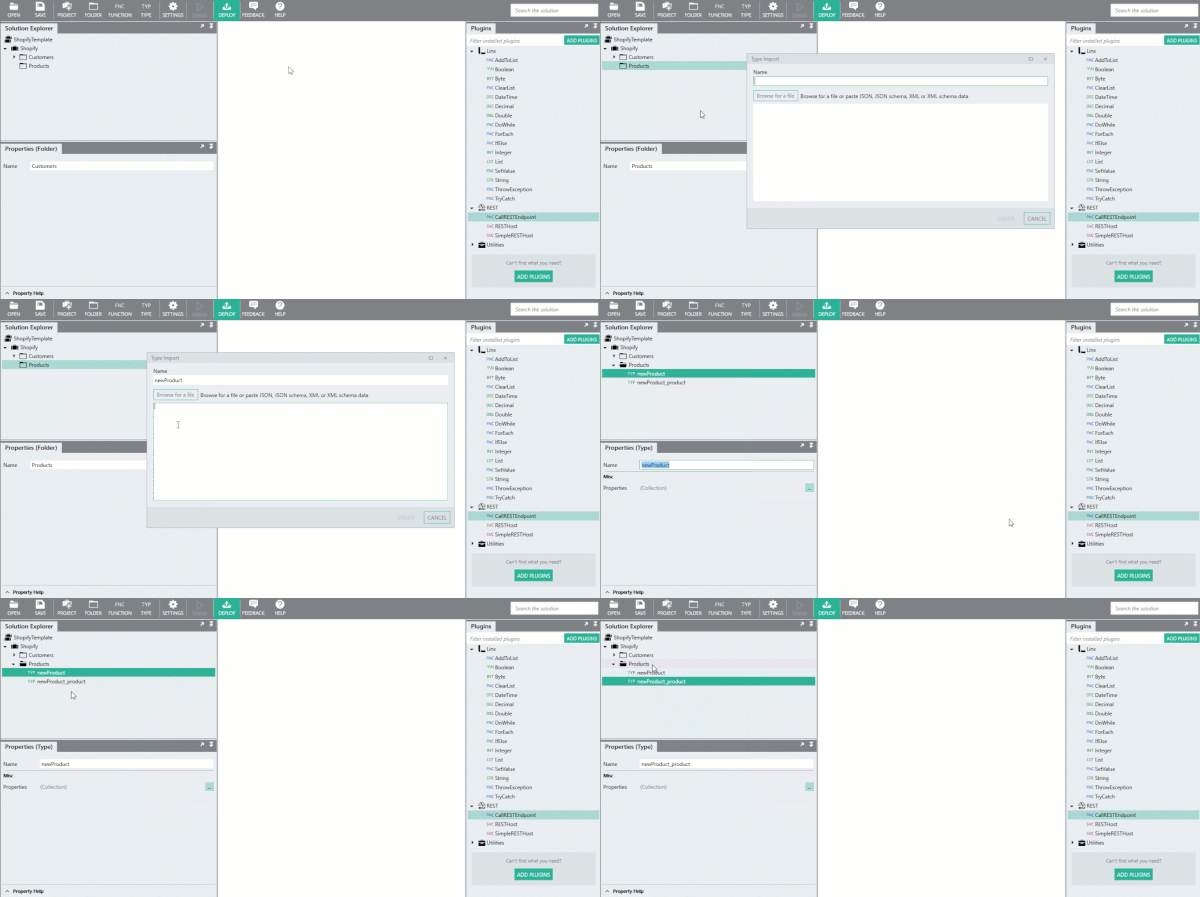
This user-defined type is then available to reference across your Linx application to structure data. Next, create a user-defined function that will take in data in this format and then submit this data to the Shopify API.
To do this, create a new user-defined function with the name of ‘CreateProduct,’ with an input parameter with the name of product and the Type of product. When this CreateProduct user-defined function is called from somewhere else in the application, the structure of the child object will be able to be used to pass data through. The parent product is not needed as an input parameter as it just creates another level; we can assign it later inside the function.
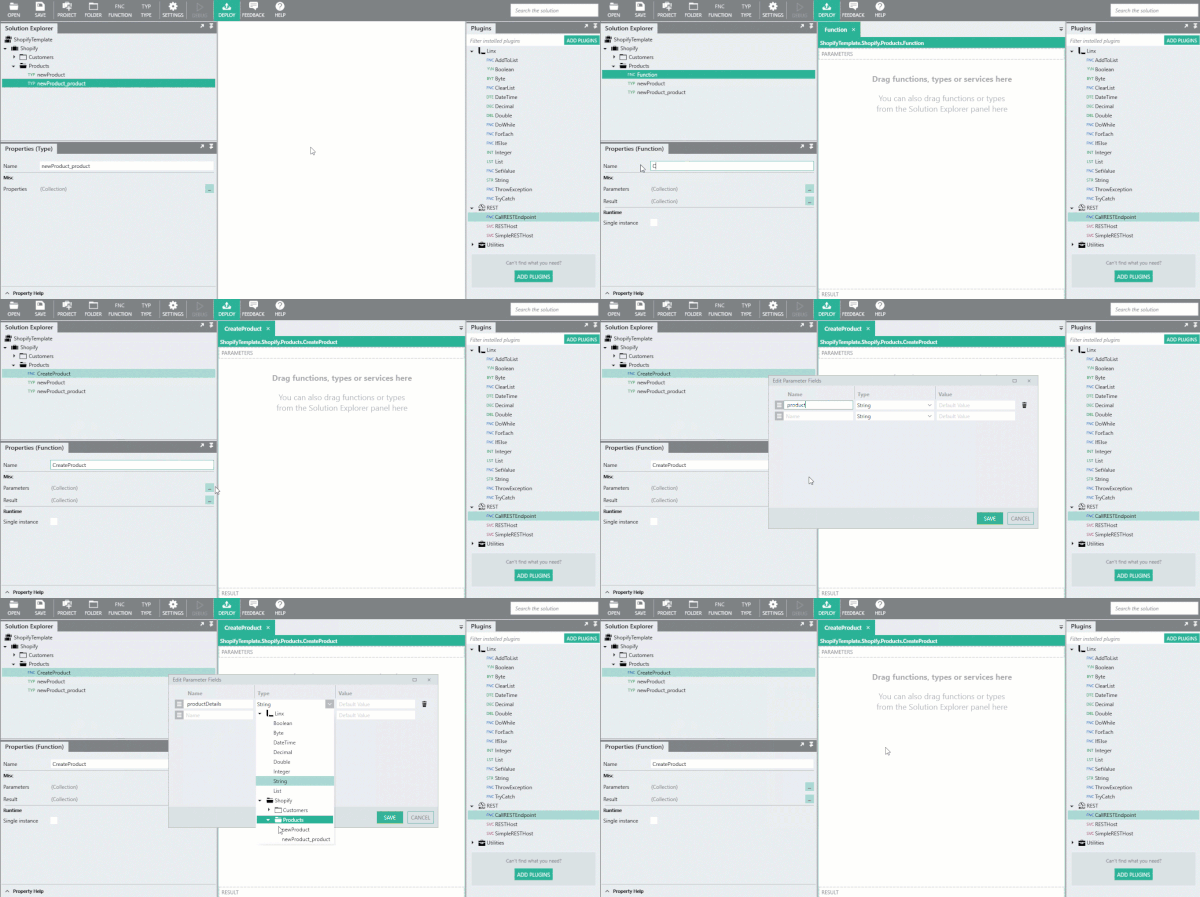
For the request body, submit a newProduct type from earlier in a JSON format. Currently, the CreateProduct function takes in an input parameter of the type newProduct_product. However, for the request to succeed, we need to submit the entire structure of newProduct. To do this, we need to assign the input parameter productDetails details as the child newProduct_product of newProduct. To do this, drag an instance of the newProduct type from the Solution Explorer onto the CreateProduct canvas. Expand its field values properties and in the product field, reference the input parameter productDetails.
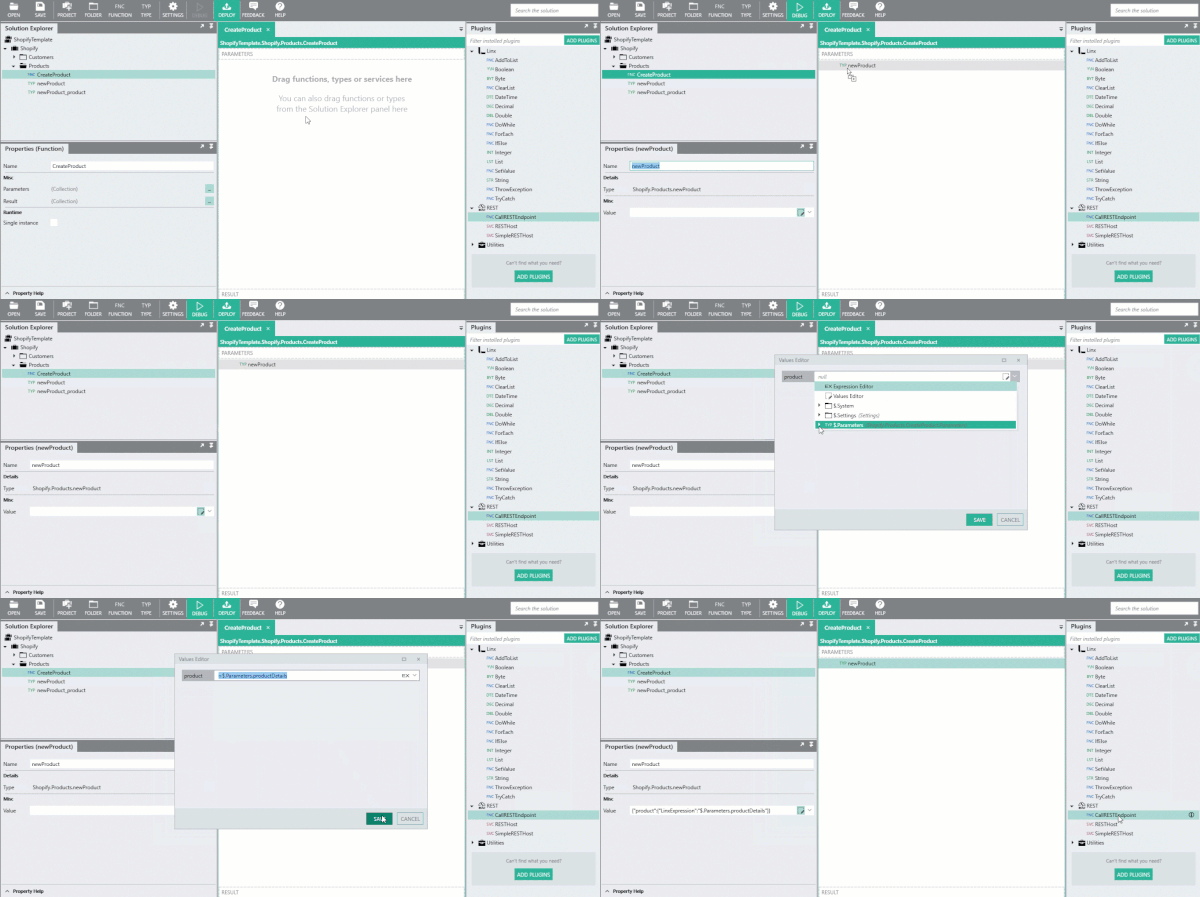
Now to make the request using the newProduct type. Inside the CreateProduct function, drag a CallRESTEndpoint onto the canvas. Configure the authentication credentials and the request URL.
Next, submit the local instance of newProduct as the request body. Change the Method of the request to POST and set the Body format as JSON. For the Body property, reference the local newProduct.
Now we can make a request to test it out.
Debug the CreateProduct function and add debug input parameter values for the new product. Add some breakpoints and logging to see how the input data is assigned to a local instance of the newProduct type and then submitted as a JSON body with a successful 201 - Created response being returned. A new product should be visible on the Shopify products dashboard:

You can then import the response as a new user-defined type and set it as the Output type of the CallRESTEndpoint function. When a new product is now created, the newly added details and some metadata, including the new id are then available in subsequent functions such as logging them to a database with an ExecuteSQL function or writing to a file using a TextFileWrite function.
More prebuilt Integration samples and templates
