REST API development can be made significantly quicker and easier with the right tools. There are many different API development tools to choose from, a low-code development tool can have your API up and running in minutes.
This article covers how to build and host an API in Linx quickly.
Low-code API development guides
- Design-first using an OpenAPI specification
- Code-first API builder, fast implementation, including hosting and documentation
Application Specifications
The application will contain a REST API hosted on a Linx application cloud server. The web service will have two endpoints, one to retrieve a full list of products and another to retrieve a specific product based on a passed-in parameter. API Key authentication will be used to secure the web service.
Database specification
The application will connect to a SQL Server cloud database hosted on an Azure instance. For this example, the database contains a table with a list of products and relevant fields that contain details.
Records will be retrieved from the database and returned in a HTTP response by Linx; filtering for a specific ‘product’ will be achieved with SQL.
API specification
The REST web service will contain the below operations:

Building REST API
Building the described application in Linx and hosting it involves the following stages:
Install the Relevant Plugins
Linx is based on a plugin architecture. Think of it as common libraries which contain functions and data types related to specific functionality. For a web service application, the REST plugin can be used. Because data will be pulled from a database, the Database plugin will also be installed.
| Plugin | REST | Database |
| Use | Consuming and Hosting REST Web services | Database integration |
| Required function | SimpleRESTHost | ExecuteSQL |
| Function description | Generate a REST API using an ‘operations wizard’ | Executes a query against a database instance and returns the results |
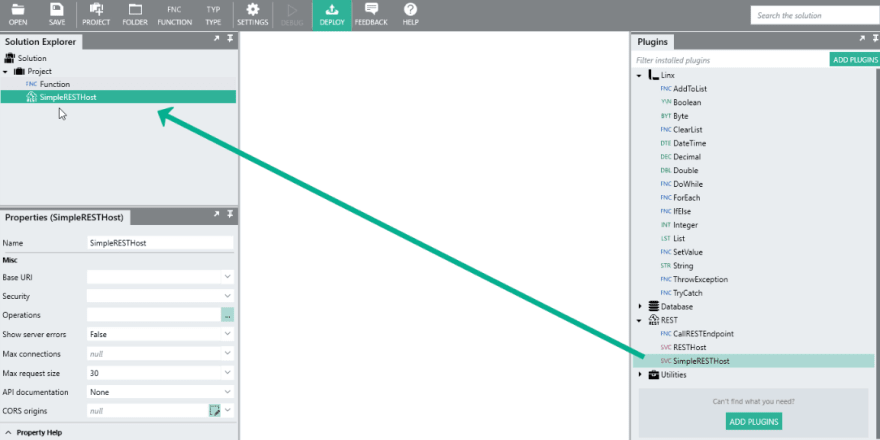
In the REST plugin, use the SWimpleRESTHost service to create the REST API. This will allow you to quickly create and configure REST operations. Add the service to your application by dragging the SimpleRESTHost service from the plugins panel into the Solution Explorer
Next, define the Base URL on which the API will be hosted on. The specific paths of each operation will be appended to this Base URL. If you want to use the service locally for testing purposes, go with something like http://localhost:8080/myapi

Defining endpoints with the wizard
A Simple REST Host sets up endpoints as operations. The operation configuration is a wizard (think of it as a GUI API Builder) that allows you to define endpoints, parameters for those endpoints and the response body (what you will get back when calling the endpoint). Here add in the GetProduct operation to start with.
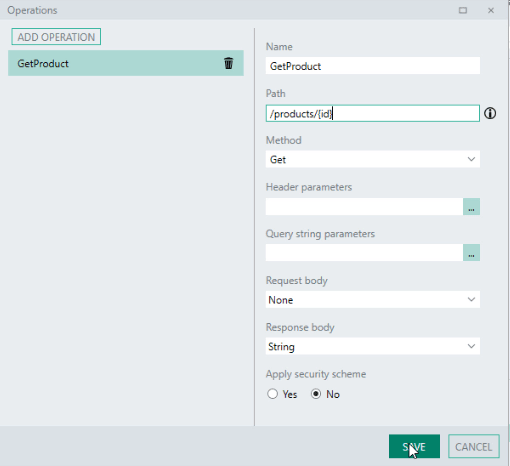
Leave the ‘response body’ type as a ‘String’ to make a “Hello World” request for testing purposes. The ‘GetProduct’ operation will be created and visible in the Linx Designer.
Add logic to the operation
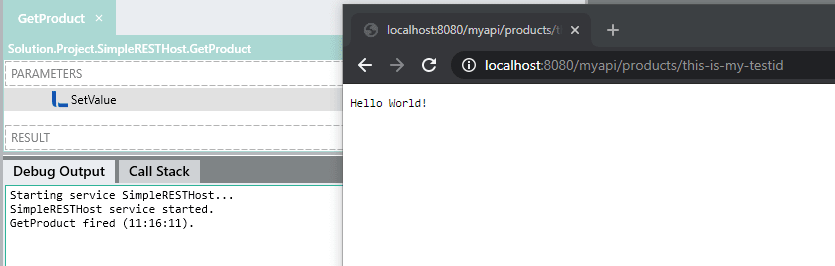
You can add logic to return your response. To start, return a simple message “Hello World!” to ensure you’ve set up everything correctly. To do this, add a SetValue function from the plugins panel onto the ‘GetProduct’ operation canvas (later versions of Linx use a Return function). Use this function to set the response body to be a simple text message: “Hello World!”.

Note that logic can be as complex or simple as you need it to be. For example, you can read from data sources, do complex logic checks, apply transformations of fields and more.
Testing the service
Active testing and debugging are one of the best things about using a low-code tool. In Linx this can be done by debugging the service in the Linx Designer. This will create a locally hosted web service. Once you have started a debugging session, you can make requests to the service by calling the endpoint in your browser or an API testing tool such as Postman.

Define a ‘product’ object
When you are ready to start building the actual logic for your API, it is good to think of what the response body will look like. To make working with responses easier, a Type can be created. A Custom Type holds values and can be as complex or as simple as you need it to be. For example, the type that will be used to store product data is illustrated in the below JSON:
To define such an object to work with in Linx, you can either import the above JSON or XML string into Linx, and a custom type mapping to those fields will be created. You can also manually create a type or alter a type by using the Type Editor.

This type can later be used across the application whenever it’s needed. The Products API will eventually return a List of products. This can be set in the Response body section when altering the operations.
To do this, navigate back to the Operations editor and set the response body of the GetProduct operation to be a product type (select via dropdown).
Retrieve data from a Database
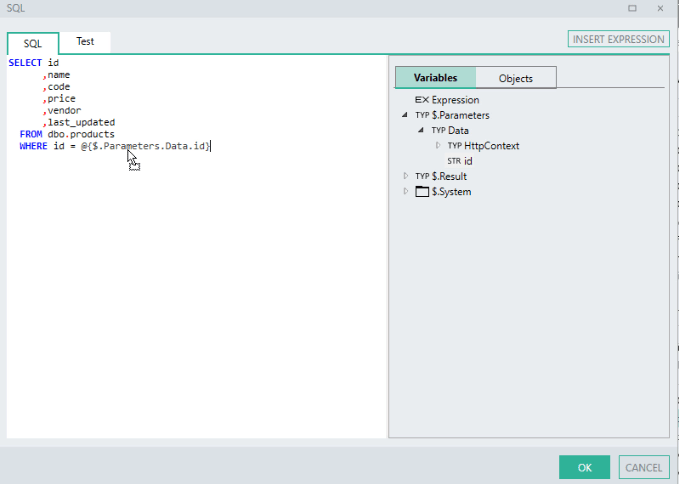
You can access a database by using the database plugin. The ExecuteSQL function can be used to execute a specific SQL Query. Linx has functionality to generate simple SQL queries such as Select, Update or Insert. You can also pass and use parameters, as an example, you can set the GetProduct operation to have a Query string parameter, call it ID. This parameter will then be usable in your operation and can be used to filter for a specific product.
After execution, you can set how data is to be returned. You can choose to return the entire dataset, loop through the rows or just return the first row. It would be best to only return the first row for the GetProduct operation.
The returned data can be set to be returned in the response body. Each field is accessible separately.
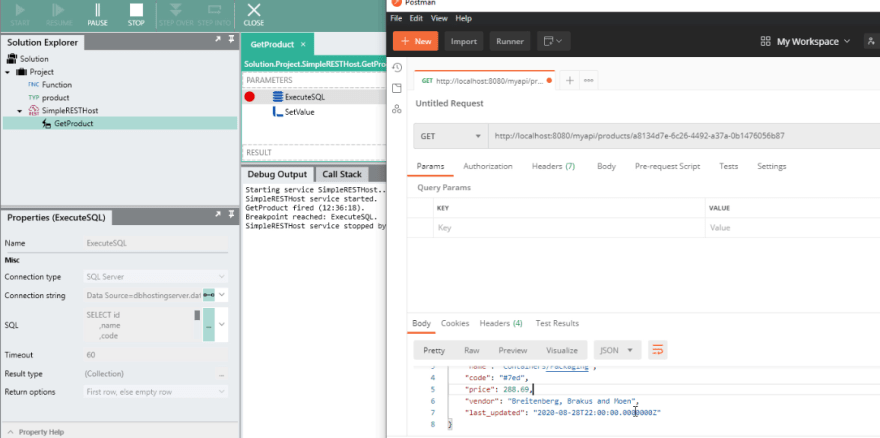
Debug the Service
When the Response body is set to be the record returned from the database, you can test your web service opperation to ensure that it returns the desired record. Start debugging the application and then start the service
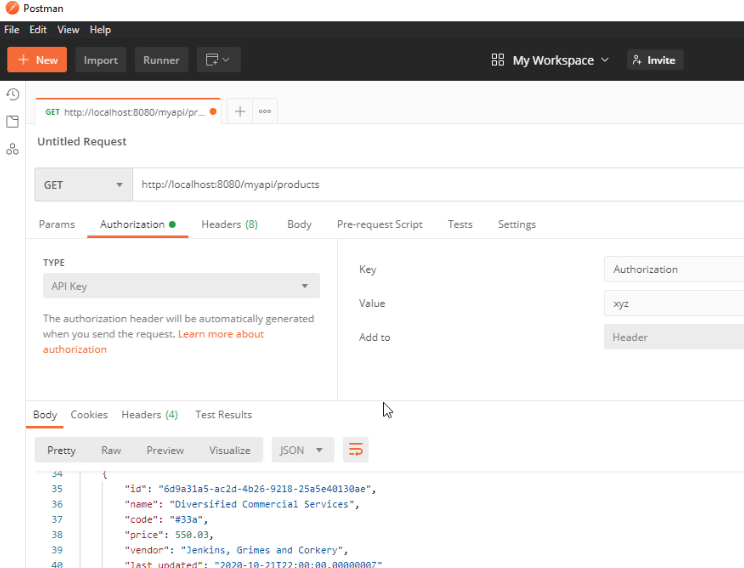
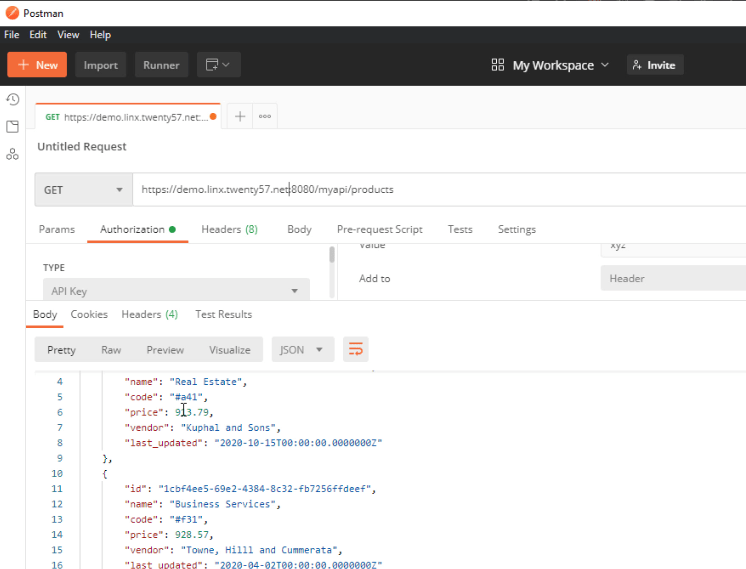
Using Postman, you can make a request to the endpoint and should then see something like this:
Returning All Products
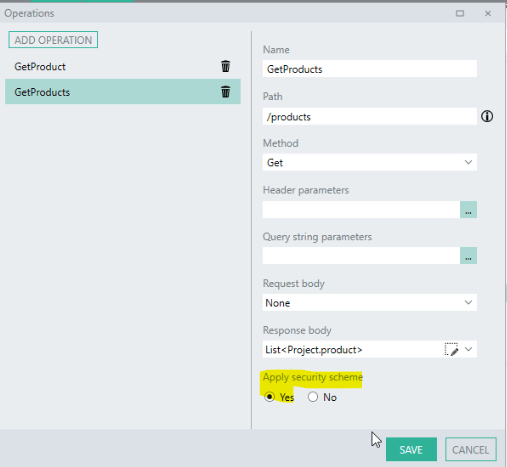
After creating the GetProduct endpoint, you can expand your API to have more operations. The next operation to add will be the GetProducts operation which returns a list of all products. This operation will follow similar steps, with the main difference is that it returns a list of products and does not filter for a specific product ID.
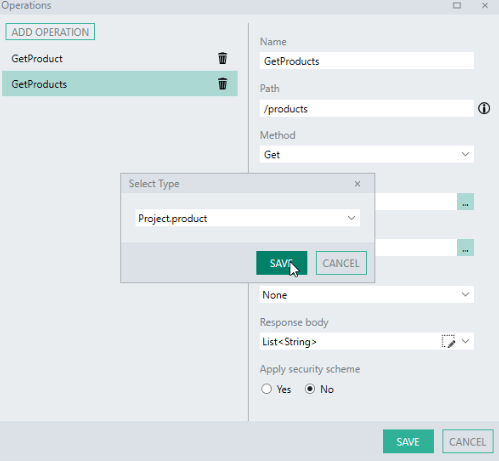
Add an operation named ‘GetProducts‘ in the Operations editor with the path ‘/products’. For the response body, set this to be a list of products. To configure the operation to do this, set the response body type as ‘List<String>’ and then, using the list type editor, set it as ‘List<product>’.
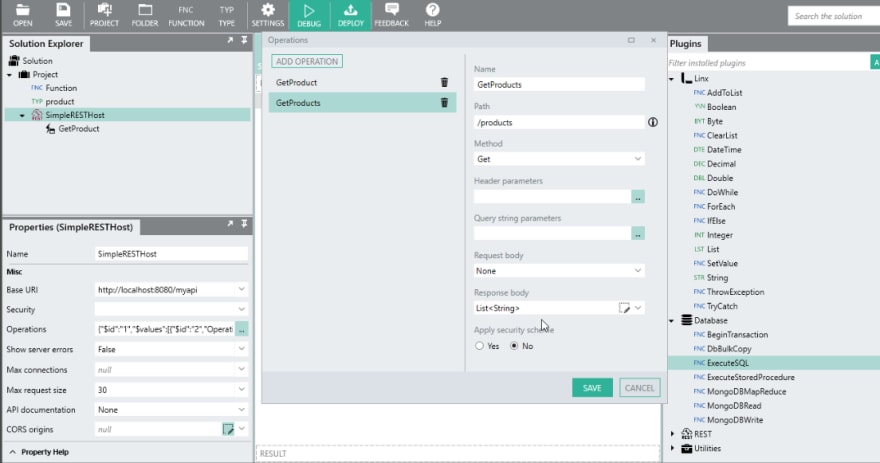
This operation will also use the ExecuteSQL function to retrieve the required data; however, no filter (WHERE) is required here as you want all records to be returned. This can be done quickly by copying the ExecuteSQL function from the GetProduct operation. Change the SQL query to remove the filter condition and set the Return Options to “List of rows”. Lastly, set the response body as the list returned by the ExecuteSQL function.
Adding API Authentication
You may want to add security for your API. Linx offers a variety of security options, specifically the Simple REST Host offers:
- API Key
- HTTP Bearer
For example, an API Key. Setting this up is rather simple. When a request is made, Linx will extract the ‘Authorization’ header from the request, this will then be available to use in your authentication event to validate the API Key against a value. The value can be stored as a constant or it can be in a database, file etc.

This will create an “Authenticate” event which will be visible in the Solution Explorer. Authentication logic can be added to this event to validate incoming requests before executing any operation.
Add authentication logic to the API
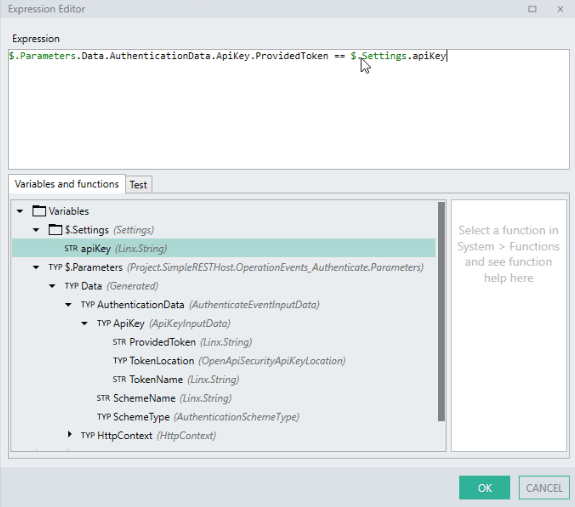
You can add logic to compare a submitted API Key with the request against a value stored as a Linx application’s $.Settings (or constant). If the value matches, the result of the authentication event is set, if it does not match, return a (401) – Unauthorized response.
Add some decision-making logic to validate the API Key by using an IfElse function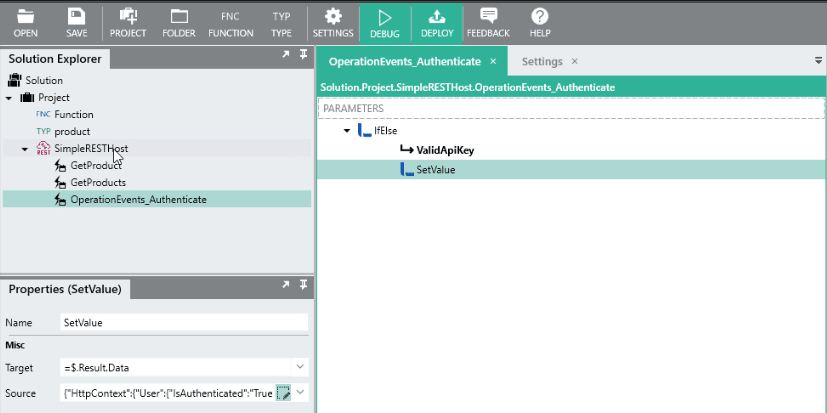
You can add custom logic via the expression editor.
After authentication has been setup, you need to attach the security scheme to each operation you want it to apply to. This can be done from the Operations editor:
Testing the API Authentication
The last step will be to test that the authentication works. This can be done by debugging the SimpleRESTHost. Then make a call to one of the endpoints with the API key as part of the call. In Postman this can be set up in the Authorization section. When making a call without the API key applied you will receive a ‘(401) – Unauthorized’ error. A successful call will return the expected data.
Deploying to Production
After creating and testing the application, you can deploy it to a Linx Server where it will be hosted.
About the Linx Server:
The Server is a Windows Service that hosts and manages your Linx Solutions and web services. You can install Linx Server on the hardware of your choice (on-premise or cloud) with monitoring, metrics and logging as standard.
Further reading: Installing the Linx Server
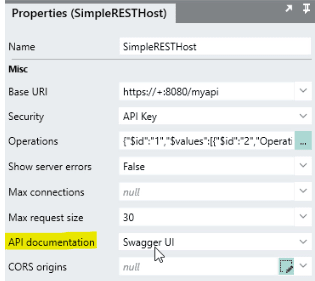
Before deploying the API you can change your Base URL to be dynamically set according to your server instance. Do this by setting the Base URI to https://+:8080/myapi. Once deployed, the ‘+’ character will grab the cloud server instance name.
One Click Deployment to the Cloud Server
Deployments can be done with one click to the Linx application server by deploying straight from the Linx Designer. The web service needs to be activated before it can be called. To do this simply turn the SimpleRestHost On. When done you can make request from anywhere against the API.

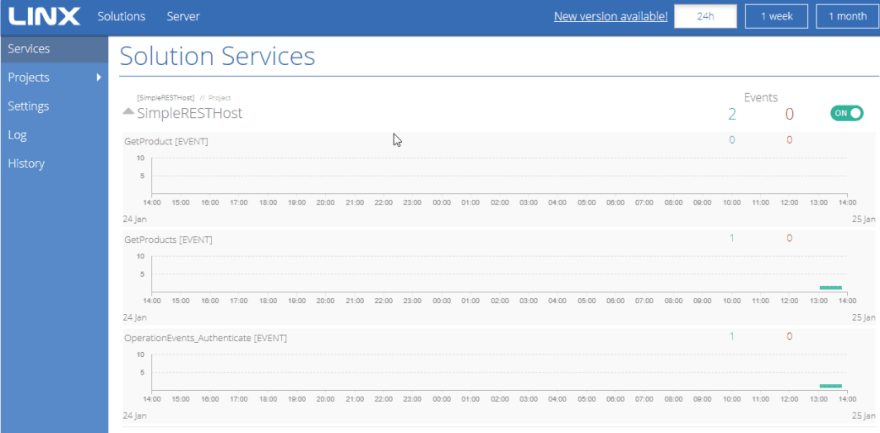
When done, you can make requests from anywhere against the API.
Easy API Documentation
Documentation can be easily hosted for you by simply turning on the feature in the Linx designer. On the SimpleRESTHost set the API Documentation property to either Swagger UI or Redocly.
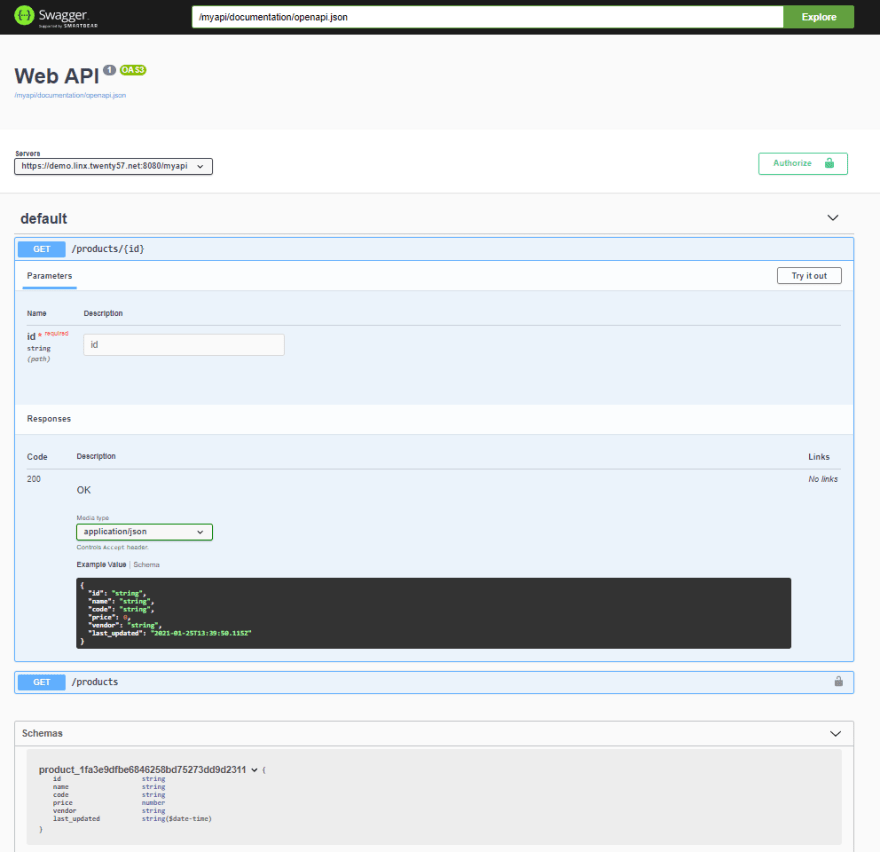
Once configured, simply redeploy the solution. Once deployed, users can request the documentation endpoint, which is hosted on: {base URL}/swagger
You’re done, that is how you can create and host a REST API using Low-Code.