OAuth 2.0 is becoming a popular alternative for application authentication. With Microsoft discontinuing Basic authentication and making OAuth 2.0 one of their new standards, many developers are sure to be in a situation where they need to change how they handle authentication for popular applications such as mailboxes, exchange services, and more.
This article will briefly touch on OAuth 2.0, how it can be used, and an example of using it read mail from an Office 365 mailbox.
TLDR; Download the demo solution to fast-track your development.
OAuth 2.0, What is it?
OAuth 2.0 is an open authorisation standard that provides a framework for granting limited access to web resources without sharing a user’s credentials. It is often used as an alternative to HTTP Basic Authentication.
Put simply, OAuth allows the user to request an access token to log in and access services and applications. This is done by using specific credentials and metadata that are sent to a server. In Microsoft Office 365, you will need to send a client ID, client secret token and additional metadata such as the scope of the access and what grant type you need. This data is sent via a REST API, and the token is received as a response. Think of the token as a limited-time passcode that will be used to log in to the application or service.
Once the token is received, it can be used in a specific way to log in or authenticate you so that you or your application can access the service.
It might need a bit of setup, but this is much more secure than traditional basic authentication, so it is no wonder why many companies are deprecating basic authentication and trading it for OAuth.
Access Emails with OAuth
Before you can start with development, you first need to set up your mailbox to be accessible via OAuth. This post will specifically focus on Office 365 mailboxes. For Office 365 you need to set up an application, set up a secret and then apply API permissions for that application. Many online tutorials show how to do this, so we will not focus on this process.
Once you have done the setup, you will have a Tenant ID, Client ID and Client Secret. These will all be used to get the access token from the OAuth API.
To get the Access token, you need to call the following endpoint:
https://login.microsoftonline.com/{TenantID}/oauth2/v2.0/token
The {TenantID} needs to be replaced with your Tenant ID. The body of your call must contain a key-value pair with the following values:
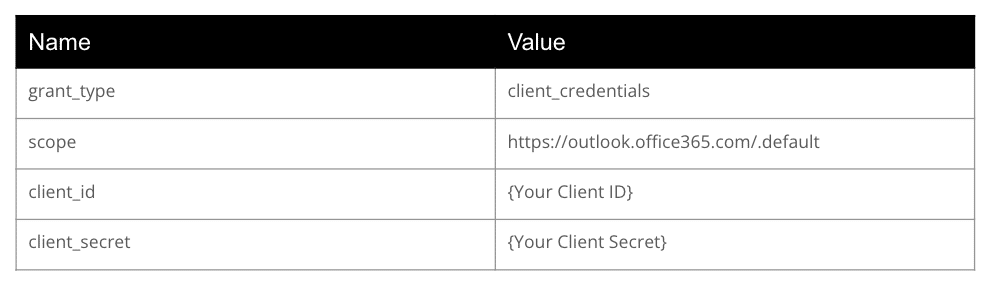
These values must be passed in as URL Encoded Content (meaning the format of your request body). In Linx, I found the best way to do this is to create a list of a custom type that contains a Name (string) and a Value (string). Then, add each of the properties mentioned above to the list, and finally, set the list as the request body.
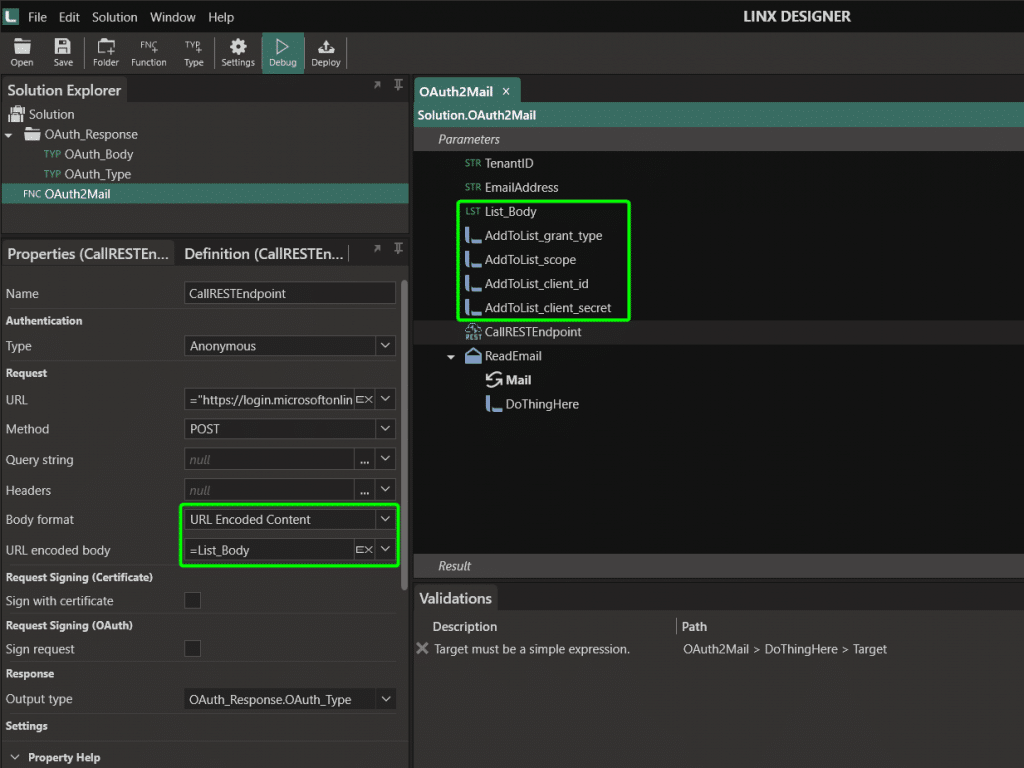
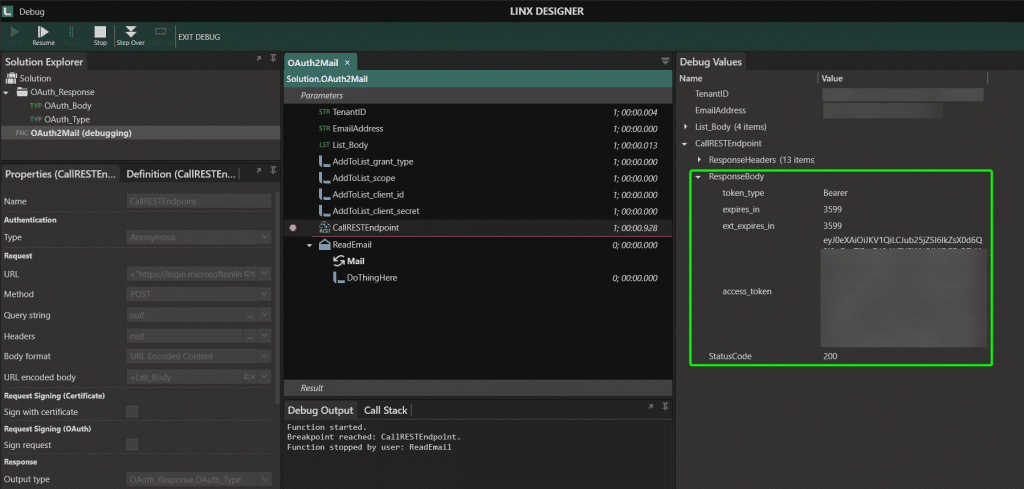
Lastly, the Method is POST. You can test to see if you are passing in all values correctly by adding a breakpoint on the CallRESTEndpint function. When the function is called, you should receive a response containing an access token and relevant meta-data. I created a Type for the response body to make it easier to use later (since this access token will be used to connect to the mailbox).
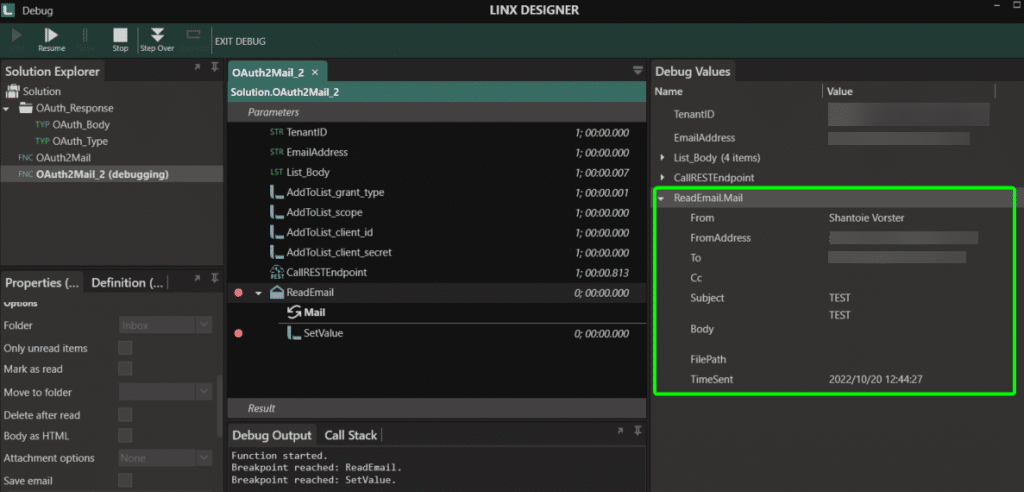
Now that you are receiving a token, you can use that token to connect to the mailbox with the help of the ReadEmail function (under the Email plugin). For this function, set the protocol to Imap, the Authentication to AuthXOAUTH2 and the password as the access token received by the CallRESTEndpoint above. The rest of the details will be standard. For Office 365, these details are as follows: User name is the email address, Port is 933 and server name is outlook.office365.com. Ensure that Use SSL is ticked on.
If all is set up correctly and the right permissions and configuration on Azure is applied, you will now be able to access the mailbox.
Many things can cause an error, so here you might need to debug a bit when you come across one. I found that if you receive an error message similar to “NO AUTHENTICATE”, this is usually an issue on the Azure configuration; likely, the API Permissions or IMAP is not set up for the specific mailbox.
Wrapping Up
OAuth might be strange and challenging when you need to use it for the first time, but you will quickly get used to it. With many service providers now opting to make OAuth2 the standard of authentication and even replacing basic authentication with it, it is important to get to grips with OAuth and find an easy way to make it part of your process. Linx can help ease this burden by making the response call much more manageable.
Get started: Download the demo solution. You can add the email address, Tenant ID, Client ID and client secret to access your mailbox.